
redis_thread
Redis Server Threads 스레드
 레디스 서버 교육 신청
|
 레디스 정기점검/기술지원
Redis Technical Support |
 레디스 엔터프라이즈 서버
Redis Enterprise Server |
|---|
Background IO(BIO) 스레드
BIO 스레드
레디스 서버는 AOF Fsync(AOF file close 포함), rdb file close, 지연 삭제(unlink, flushdb async)에 Background IO 스레드가 사용됩니다. Redis ver 7.2.3 기준버전 2.4에서 2개의 sub 스레드가 추가되었습니다.
① AOF Fsync를 별도 스레드(BIO_AOF_FSYNC)에서 처리하고,
② rdb 파일 닫기(close)도 별도 스레드(BIO_CLOSE_FILE)에서 처리합니다.
버전 4.0에서 ③ unlink, flushdb async 명령을 처리하기 위해서 BIO_LAZY_FREE 스레드가 새로 추가되었습니다. 별도 스레드에서 지연 처리를 합니다.
- 메인 스레드:모든 명령어 처리, 이벤트 처리 등을 합니다.
- Sub 스레드 1번(BIO_CLOSE_FILE): rdb 파일을 close할 때 작동한다. rdb 파일은 save 옵션을 활성화 했거나 마스터와 복제 서버간 동기활 때 생성된다.
- Sub 스레드 2번(BIO_AOF_FSYNC/BIO_CLOSE_AOF): 스레드는 하나인데, 역할을 구분해서 작동한다.
BIO_AOF_FSYNC: 1초 마다 AOF에 쓸 때 동작한다.
BIO_CLOSE_AOF: AOF Rewrite 할 때 새 파일에 Rewrite 완료하고 기존 파일을 close 할 때 동작한다. AOF를 활성화하지 않아도 스레드는 생성된다. - Sub 스레드 3번(BIO_LAZY_FREE): UNLINK, 비동기 FLUSHALL 또는 FLUSHDB 명령을 처리할 때 동작한다. 이 스레드는 버전 4.0에 추가되었다.
- 스레드 4번 jemalloc_bg_thd: jemalloc background thread, 버전 6.0에 추가되었다.
리눅스 명령으로 스레드 확인하는 방법
이것은 redis-7.2.3에서 io-threads 4로 설정한 것입니다. 기본 IO 처리는 main thread(redis-server)에서 처리하고, io_thread 3개가 더 생깁니다.$ ps -eLF | egrep "PID|redis-server" 여기서 LWP가 Light Weight Process 즉, Thread ID입니다. NLWP는 이 프로세스의 총 스레드 수입니다. 첫 번째가 메인 스레드, 두 번째부터가 Sub 스레드입니다.
ps H -o 'tid comm' pid 명령으로 스레드 명(이름)을 확인할 수 있습니다.
$ ps H -o 'tid comm' 6523
top -H -d 1 -p pid 명령으로 스레드별 CPU 사용률을 알 수 있습니다.
$ top -H -d 1 -p 6523
strace 명령으로 스레드가 실행하는 system call을 확인할 수 있습니다.
$ strace -p 6525 이것은 bio_aof 스레드가 1초 마다 한 번씩 AOF에 쓸 때 fdatasync()를 수행하는 것을 켑처한 것입니다.
소스 설명
- Background IO(BIO) function들은 bio.c에 있습니다. 소스 설명은 Redis 7.2.4 기준입니다.
- 스레드 생성: main()에서 서버 초기화 처리가 끝난 후 스레드를 생성합니다.
main() -> InitServerLast() -> bioInit();server.c
int main(int argc, char **argv) {
initServerConfig(); // config default value setting
loadServerConfig(server.configfile, config_from_stdin, options); // read redis.conf
initServer(); // TimeEvent: serverCron(), FileEvent: client/tcp handler
InitServerLast(); // BIO, IO Thread 생성
aofLoadManifestFromDisk();
loadDataFromDisk();
aofOpenIfNeededOnServerStart();
aofDelHistoryFiles();
redisSetCpuAffinity(server.server_cpulist);
aeMain(server.el);
aeDeleteEventLoop(server.el);
return 0;
}
void InitServerLast(void) {
bioInit(); // bio.c background IO: aof_fsync, file close, lazy free
initThreadedIO(); // networking.c IO thread
set_jemalloc_bg_thread(server.jemalloc_bg_thread); // zmalloc.c
server.initial_memory_usage = zmalloc_used_memory();
} - bio_close_file(BIO_CLOSE_FILE): rdb file close에 사용되는 스레드. bio.c
void bioCreateCloseJob(int fd, int need_fsync, int need_reclaim_cache)이 function을 호출하는 곳
rdb.c rdbLoad()
replication.c bg_unlink(), closeRepldbfd(), readSyncBulkPayload()
- bio_aof(BIO_AOF_FSYNC/BIO_CLOSE_AOF): AOF fsync(1초마다 실행), AOF file close에 사용되는 스레드. bio.c
void bioCreateFsyncJob(int fd, long long offset, int need_reclaim_cache)이 function을 호출하는 곳: aof.c aof_background_fsync()void bioCreateCloseAofJob(int fd, long long offset, int need_reclaim_cache)이 function을 호출하는 곳: aof.c aof_background_fsync_and_close()
- bio_lazy_free(BIO_LAZY_FREE): UNLINK, 비동기 FLUSHALL 또는 FLUSHDB 명령을 처리할 때 사용되는 스레디. bio.c
void bioCreateLazyFreeJob(lazy_free_fn free_fn, int arg_count, ...)이 function을 호출하는 곳: lazyfree.c freeObjAsync(), emptyDbAsync(), freeTrackingRadixTreeAsync(), freeLuaScriptsAsync(), freeFunctionsAsync(), freeReplicationBacklogRefMemAsync()
I/O 멀티 스레드
I/O Multi threads
- 버전 6.0 부터 클라이언트에 대한 읽기(read)/쓰기(write)용 I/O 스레드를 구성할 수 있습니다.
관련 소스는 networking.c에 있습니다. Redis ver 7.2.3 기준 - io-threads 숫자(스레드 개수): 디폴트는 1이다. 1은 스레드를 생성하지 않고
메인 스레드에서 I/O를 처리하는 것으로 기존과 같다.
2 이상을 지정하면 (io-threads - 1) 개수만큼 스레드가 생성된다.
디폴트로는 생성된 스레드는 쓰기만 담당한다. 읽기는 메인 스레드에서 한다.
io-threads 숫자 -> server.io_threads_num - io-threads-do-reads yes/no: 디폴트 no.
Yes로 설정하면 생성된 I/O용 스레드가 읽기/쓰기를 같이 한다.
(읽기/쓰기용 스레드로 나뉘는 것이 아니고 한 스레드가 읽기/쓰기를 같이 한다.)
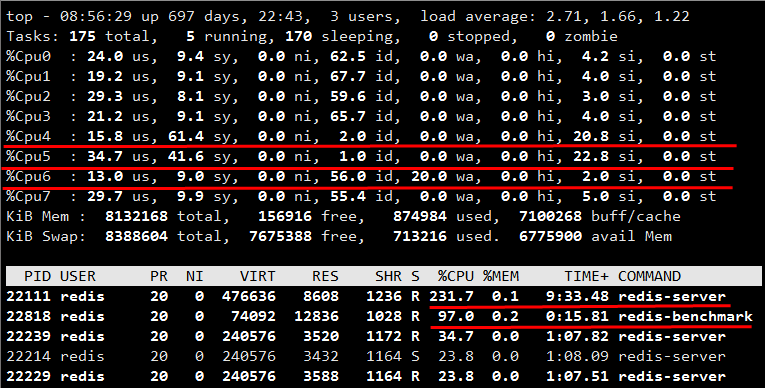
io-threads-do-reads yes/no -> server.io_threads_do_reads 1/0 - 테스트: 마스터 1대(io-threads 4)(서버 8cores) -> 복제 3대(io-threads 1)
- src/redis-benchmark -p 6000 -t set -d 1024 -n 5000000 -q
- Cpu4,5가 마스터, benchmark이다. si(software interrupt)가 20% 정도이다. 이는 malloc 수행에서 발생하는것으로 보인다.
- AOF 쓰기는 스레드 지정과 관계없이 별도의 CPU-core를 사용한다.
Cpu6: wa(IO wait)이 20이다. - 위와 같이 구성해서 테스트해보면 마스터가 CPU를 231% 사용하지만 처리 성능(초당 처리 명령수)는 오히려 5~10% 정도 떨어진다.
- I/O 멀티 스레드의 성능은 서버 설정도 중요하지만 클라이언트의 설정도 중요합니다.
Redis-7에서 클라이언트의 설정까지 잘 맞추면 약 16%의 성능 향상이 있고, Redis-8에서는 73%의 성능 향상이 있습니다. Redis-8에서 'I/O 멀티 스레드'의 성능이 크게 향상되었습니다.
자세한 내용은 여기를 보세요. (업데이트: 2025년 05월)
소스 설명
- I/O Multi threads function들은 networking.c 뒤 부분에 "Threaded I/O"로 별도 구분되어 있습니다.
소스 설명은 Redis 7.2.4 기준입니다. - 스레드 생성: main()에서 서버 초기화 처리가 끝난 후 스레드를 생성합니다.
main() -> InitServerLast() -> initThreadedIO();void InitServerLast(void) {
bioInit(); // bio.c background IO: aof_fsync, file close, lazy free
initThreadedIO(); // networking.c IO thread
set_jemalloc_bg_thread(server.jemalloc_bg_thread); // zmalloc.c
server.initial_memory_usage = zmalloc_used_memory();
} - void initThreadedIO(void): IO 스레드 생성
for (int i = 0; i < server.io_threads_num; i++) {
io_threads_list[i] = listCreate();
pthread_t tid;
pthread_mutex_init(&io_threads_mutex[i],NULL);
pthread_mutex_lock(&io_threads_mutex[i]); /* Thread will be stopped. */
pthread_create(&tid,NULL,IOThreadMain,(void*)(long)i);
io_threads[i] = tid;
} - void *IOThreadMain(void *myid): 리스트에 client가 있으면 op 구분에 따라 쓰기 함수(writeToClient)
또는 읽기 함수(readQueryFromClient)를 호출합니다.
while(1) {
listIter li;
listNode *ln;
listRewind(io_threads_list[id],&li);
while((ln = listNext(&li))) {
client *c = listNodeValue(ln);
if (io_threads_op == IO_THREADS_OP_WRITE) {
writeToClient(c,0);
} else if (io_threads_op == IO_THREADS_OP_READ) {
readQueryFromClient(c->conn);
}
}
listEmpty(io_threads_list[id]);
} - void beforeSleep(struct aeEventLoop *eventLoop) server.c
hz 10 이면 1초에 10번 실행하고, 명령이 실행된 후에 실행됩니다.handleClientsWithPendingReadsUsingThreads(); // 미 처리된 읽기를 IO 스레드에 분배합니다.
handleClientsWithPendingWritesUsingThreads(); // 미 처리된 쓰기를 IO 스레드에 분배합니다. - afterSleep(), beforeSleep()은 언제 실행되나
• afterSleep(), beforeSleep() 모두 1초에 10번 실행됩니다. (hz 10인 경우) afterSleep()이 먼저 실해되고, beforeSleep()이 나중에 실행됩니다. 아래 로그 참조.
• 명령이 실행되기 전 afterSleep()이 실행되고, 명령이 실행된 후 beforeSleep()이 실행됩니다.
12:23:18.199 * TEST LOG: afterSleep() hz
12:23:18.199 * TEST LOG: beforeSleep() hz
12:23:18.235 * TEST LOG: afterSleep() cmd
12:23:18.235 * TEST LOG: processInputBuffer() argv[0]: set
12:23:18.235 * TEST LOG: beforeSleep() cmd
12:23:18.299 * TEST LOG: afterSleep() hz
12:23:18.299 * TEST LOG: beforeSleep() hz
- int handleClientsWithPendingReadsUsingThreads(void):
미 처리된 읽기를 IO 스레드에 분배합니다.
listIter li;
listNode *ln;
listRewind(server.clients_pending_read,&li);
int item_id = 0;
while((ln = listNext(&li))) {
client *c = listNodeValue(ln);
int target_id = item_id % server.io_threads_num;
listAddNodeTail(io_threads_list[target_id],c);
item_id++;
} - int handleClientsWithPendingWritesUsingThreads(void):
미 처리된 쓰기를 IO 스레드에 분배합니다.
// stopThreadedIOIfNeeded(): 미 처리된 쓰기가 적으면 메인 스레드에서 처리합니다.
if (server.io_threads_num == 1 || stopThreadedIOIfNeeded()) {
return handleClientsWithPendingWrites(); // 메인 스레드에서 처리
}
startThreadedIO(); // IO thread를 시작합니다.
listIter li;
listNode *ln;
listRewind(server.clients_pending_write,&li);
int item_id = 0;
while((ln = listNext(&li))) {
client *c = listNodeValue(ln);
int target_id = item_id % server.io_threads_num;
listAddNodeTail(io_threads_list[target_id],c);
item_id++;
} - void startThreadedIO(void): IO thread를 시작합니다.
for (int j = 1; j < server.io_threads_num; j++)
pthread_mutex_unlock(&io_threads_mutex[j]); // io_threads_mutex를 해제합니다.
server.io_threads_active = 1; - int stopThreadedIOIfNeeded(void): 미 처리된 쓰기가 io_threads_num*2 보다 적으면
IO 스레드를 사용하지 않는다.
int pending = listLength(server.clients_pending_write);
if (pending < (server.io_threads_num*2)) {
if (server.io_threads_active) stopThreadedIO(); // IO 스레드 사용 중지
return 1;
} else {
return 0;
} - void stopThreadedIO(void): IO thread를 중지합니다.
handleClientsWithPendingReadsUsingThreads();
for (int j = 1; j < server.io_threads_num; j++)
pthread_mutex_lock(&io_threads_mutex[j]); io_threads_mutex를 잠급니다(잠근다).
server.io_threads_active = 0;
THREADED I/O redis.conf에 있는 IO 스레드 설명
Redis는 대부분 단일 스레드이지만 UNLINK, 느린 I/O 액세스 및 측면 스레드에서 수행되는 기타 작업과 같은 특정 스레드 작업이 있습니다.
Redis is mostly single threaded, however there are certain threaded operations such as UNLINK,
slow I/O accesses and other things that are performed on side threads.
이제 다양한 I/O 스레드에서 Redis 클라이언트 소켓 읽기 및 쓰기를 처리하는 것도 가능합니다.
특히 쓰기 속도가 너무 느리기 때문에 일반적으로 Redis 사용자는 코어당 Redis 성능 속도를 높이기 위해
파이프라인을 사용하고 더 많은 확장을 위해 여러 인스턴스를 생성합니다.
I/O 스레드를 사용하면 인스턴스의 파이프라인이나 샤딩에 의존하지 않고도 Redis 속도를 두 배로 쉽게 높일 수 있습니다.
Now it is also possible to handle Redis clients socket reads and writes in different I/O threads.
Since especially writing is so slow, normally Redis users use pipelining in order to speed up
the Redis performances per core, and spawn multiple instances in order to scale more.
Using I/O threads it is possible to easily speedup two times Redis without resorting to pipelining nor sharding of the instance.
기본적으로 스레딩은 비활성화되어 있으므로 코어가 4개 이상인 시스템에서만 활성화하고
예비 코어를 하나 이상 남겨 두는 것이 좋습니다.
8개 이상의 스레드를 사용하는 것은 별 도움이 되지 않습니다.
또한 실제로 성능 문제가 있는 경우에만 스레드 I/O를 사용하는 것이 좋습니다.
Redis 인스턴스는 CPU 시간의 상당 부분을 사용할 수 있습니다.
그렇지 않으면 이 기능을 사용할 필요가 없습니다.
By default threading is disabled, we suggest enabling it only in machines that have at least 4 or more cores,
leaving at least one spare core.
Using more than 8 threads is unlikely to help much.
We also recommend using threaded I/O only if you actually have performance problems,
with Redis instances being able to use a quite big percentage of CPU time,
otherwise there is no point in using this feature.
예를 들어 코어 상자가 4개라면 2개 또는 3개의 I/O 스레드를 사용해 보고,
코어가 8개라면 스레드 6개를 사용해 보세요.
I/O 스레드를 활성화하려면 다음 구성 지시문을 사용하십시오.
So for instance if you have a four cores boxes, try to use 2 or 3 I/O threads, if you have a 8 cores,
try to use 6 threads. In order to enable I/O threads use the following configuration directive:
io-threads 4
io-threads를 1로 설정하면 평소처럼 메인 스레드만 사용됩니다.
I/O 스레드가 활성화되면 쓰기용 스레드만 사용합니다. 즉, write(2) 시스템 호출을 스레드하고 클라이언트 버퍼를 소켓으로 전송하는 것입니다.
그러나 다음 구성 지시문을 yes로 설정하여 읽기 스레딩 및 프로토콜 구문 분석을 활성화할 수도 있습니다.
Setting io-threads to 1 will just use the main thread as usual.
When I/O threads are enabled, we only use threads for writes, that is to thread the write(2) syscall and transfer the client buffers to the socket.
However it is also possible to enable threading of reads and protocol parsing using the following configuration directive, by setting it to yes:
io-threads-do-reads no
일반적으로 스레딩 읽기는 별로 도움이 되지 않습니다.
Usually threading reads doesn't help much.
참고 1: 이 구성 지시문은 CONFIG SET을 통해 런타임에 변경할 수 없습니다.
또한 SSL이 활성화된 경우 현재 이 기능이 작동하지 않습니다.
NOTE 1: This configuration directive cannot be changed at runtime via CONFIG SET.
Also, this feature currently does not work when SSL is enabled.
참고 2: redis-benchmark를 사용하여 Redis 속도 향상을 테스트하려면 Redis 스레드 수와 일치하도록 --threads 옵션을 사용하여
스레드 모드에서도 벤치마크 자체를 실행해야 합니다. 그렇지 않으면 수행할 수 없습니다. 개선 사항을 확인하십시오.
NOTE 2: If you want to test the Redis speedup using redis-benchmark, make sure you also run the benchmark itself in threaded mode,
using the --threads option to match the number of Redis threads, otherwise you'll not be able to notice the improvements.
| << Client Side Caching | POSIX Thread >> |
|---|